A few weeks ago I had the pleasure of visiting the Wharton Esherick Studio, lured there by a combination of a work trip to Philadelphia and Chuck Bender's Popular Woodworking article. I knew about the sculpture and the staircase, but seeing (really, feeling) the studio and hearing the story of how Esherick lived there was much more powerful than I expected.
The tour guide had me at the garage and the workshop, which contrasted severely. The garage reflected both Esherick's quirkiness and his need to build cheaply. The workshop may have begun as Louis Kahn's hexagonal vision, but Esherick's insistence on adding curves and leaving the corners looking dovetailed gave me hope that even severe modernism can occasionally tone down to something more fun.
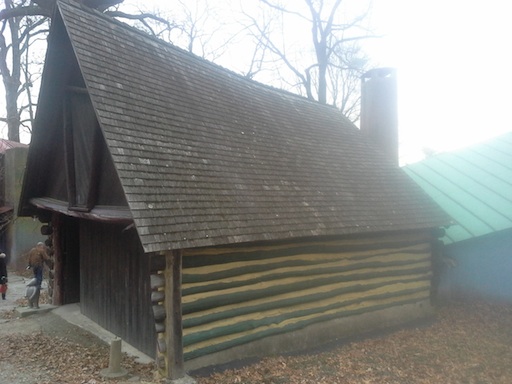
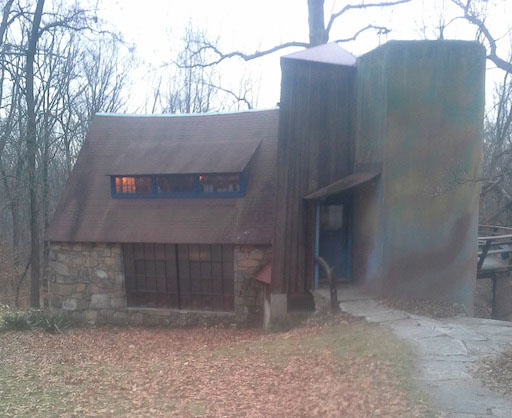
Esherick's log garade, with Kahn's workshop at right.
The studio, though, had a lot of power. The building itself was impressive (though I wonder about the concrete silo), and so much was still where it had been that it wasn't hard to imagine Esherick working and living there. Despite sending many of his pieces on their way to the world, his work was still very present.
The tour made it much more present by inviting us to touch the wooden pieces. Those surfaces were somehow soft, despite obviously being wood. The edges, the finish, the surfaces - all played with the shapes. Technical and design mastery, yes, but also a sense of comfort.
Esherick started out as a painter, took up carving to decorate his frames and create his woodcuts, and then shifted from carver to sculptor and builder. I'm not sure the shift in his furniture from surface decoration to sculptural form is the necessary evolution many modernists seem to praise, but it certainly reflects a change in scale.
The studio compresses that story into a building and its contents. Because the studio was a combination of where he had worked, lived, and displayed his projects, it was easy to see how the pieces came together. It was even easy, in the case of his desks, to see the similarities that still unified his pieces despite the shift from surface decoration to form. He still liked a similar style of drawer, avoided hardware pulls, preferred softened edges, and achieved a luminous glow in the finish.
The inside of the building is in many ways magical, from the famous spiral staircase to the latches to the kitchen floor made of scrap boards of fruitwood. The copper sinks fit perfectly. The only things that felt to me to be out of place were a linoleum floor in the final kitchen extension and the (completely justified by water) shift to polyurethane finishes in the kitchen. The spaces, both large and small, feel intimate, explorable, and cozy.
Though Esherick wasn't an architect, the choices he made in building the house and the log garage almost created a building that seems like it belong there. The concrete silo seems an odd departure, despite its supposedly autumn pigments, as does the Louis Kahn hexagons shop. At least when he played with the materials of architectural modernism, he made sure the play was evident. I'm not sure either of those is enough to make those attractive, but both were steps outside of him usual work.
The studio and especially the house have me rethinking the way I look at both furniture and carving. Esherick's willingness to explore rounded shapes - concave and convex in multiple dimensions - reinforces my interest in looking beyond square. I don't plan to abandon visible hardware completely, but his desks in particular have me rethinking how components should fit. On the carving side, I still want to explore surface decoration, and in fact I'm inspired by both his frames and his woodcuts. In many ways, I find the early Esherick more compelling, but I love the way that all the pieces came together.
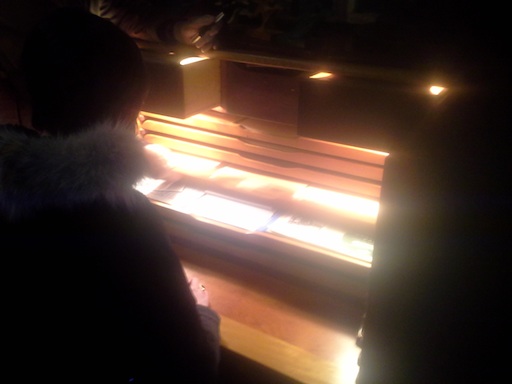
Esherick desk, lit in darkness.
I'll have to go back sometime, bringing a better camera than a cellphone with a crack in the lens. If you'd like to see more, definitely go there. If you can't get there easily, this book conveys as much as can be done in print.
For years, it haunted me: the danger that a piece I was making for a project wouldn't be square, or would shift out of square after I'd carefully put it together. The lack of truly flat surfaces in my shop meant I had to check for flatness all the time, and often the result was disappointment.
The woodworking books I read, whether they relied on power tools or hand tools, assumed that joinery was the primary task. Though not every joint is square, flat and square boards are the foundations of joinery. Of course they started with square!
Leaping to square, though, means that you immediately start out treating wood like any other material, a material that has to conform to certain human expectations about its shape. The appearance of the wood might still matter, but the grain of the wood becomes just an inconvenience to be dealt with. If you can't make the wood conform to those tight tolerances, your project fails.
This makes excellent sense when you're building furniture, but it's a lousy place for beginners to start. It offers little freedom and much failure.
When I first started writing Tool by Tool, Skill by Skill, the list of tools and projects was all about joinery.
It didn't last. Exploring the knife soon brought me to exploring gouges, which reminded me that there is a lot you can do with wood before you break out a square. Working with knife, gouge, and chisel teaches more than just the challenges of wood grain - they teach about form, shape, and shadow. They free you from the world of neat squares and angles and encourage you to explore that dangerous feature, decoration.
I will get to joinery soon enough, but for the moment I'm reveling in wood's many other possibilities.
I'm doing a lousy job of blogging here, but I am writing about woodworking:
Right now it's just the Preface, Chapter 1 (Workspaces), and a sequence that gives you a sense for the rest of the book to come.
I'll post here when I have time to push the book forward. My rough immediate plan is to have the Knife chapter, the projects for it, and the Sharpening appendix section on knives done by the end of October.
Update: That schedule didn't work out so well. Perhaps by early January...
I think of Popular Woodworking as the magazine that taught me that using hand tools was both possible and powerful. It wasn't just Chris Schwarz, but a lot of writers there. However, it wasn't always so.
I just found this in the April 2000 issue, which I'd kept for Schwarz's brilliant but controversial "Woodworking on Death Row" article. It doesn't sound like readers were too familiar with the hand tool approach.
Shakers eagerly sought out power tools and technology to help them do their work. But during the heyday of most Shaker communities, hand tools did most of the work.
Today there is a group of woodworkers who still pride themselves in building furniture this way. They call themselves "Neanderthals." And the way they communicate is, ironically, usually through the Internet. We thought it would be interesting to build a project using only hand tools to get a feel for how early Shakers and electronic-age Neanderthals work. Admittedly, we copped out on one aspect of this project: we didn't surface the lumber from rough stock using hand tools. We rationalized this by figuring an apprentice would have done this work.
I think you'll enjoying unplugging your router for a few days to tackle this modest but satisfying project. And if you cannot give up your power tools, you can rest easy knowing that the early Shakers would have paid almost any price for that precision plunge router on your bench. (Jim Stuard, "Shaker Stepstool", Popular Woodworking, April 2000, page 53.)
Times have changed. At this point I was buying my router and tablesaw...
[The other piece for the column that never happened.]
While woodworking is often treated as a single large subject in magazines, books, and web sites, it's comprised of a lot of smaller pieces. Many woodworkers are generalists, combining skills from several areas, as most projects require at least a bit of knowledge in several different fields.
The following list of woodworking practices isn't necessarily exhaustive, and it isn't necessarily the way that everyone would categorize things, but it might give you a basic idea of what's involved in creating projects that interest you.
Design
While design can be a world of its own, many woodworkers prefer to work from plans created by others. Most design usually takes place at the start of a project, though impromptu design work during a project happens more frequently than many people probably care to admit. Designing a complex piece with wood requires more than an aesthetic conception of the final piece; it requires an understanding of the materials to be used, how they expand and contract over time, and how they can be connected so that movement doesn't cause problems.
Projects built strictly on the basis of looks may not last more than a few seasons, as the wood's movement distorts or breaks the piece. Of course, ugly furniture which lasts forever may not always be welcome either.
Sharpening
Strictly speaking, sharpening is metalwork, but having sharp tools readily available makes working wood immensely simpler. Dull tools are dangerous and frustrating. Hand tools often need to be sharpened to work at all. Many power tools use replaceable blades or carbide blades which generally require professional sharpening, so power tool users may just buy their sharpening.
Harvesting
Again, a lot of woodworkers just buy their wood, but some, especially turners, use found wood or have their own wood lots. (In that case, forestry is a woodworking skill.) A chainsaw is undoubtedly the easiest way to do this, but harvesting wood is probably the most dangerous aspect of the whole process. Between the saws and the falling trees, there are a lot of ways to get hurt. Careful drying of the wood is crucial to keeping your harvest useful for more than firewood.
Milling
Milling starts at the sawmill, where logs are turned into more manageable boards, and continues all the way through to the final sizing of components for a particular project. Power milling tools include saws for cutting wood, jointers for flattening a face, and planers for creating boards with parallel flat faces. On the hand tool side, saws and planes are the primary tools. (Riving wood, splitting it along the grain, is another approach, mostly used by chair-makers, coopers, and rustic furniture makers.)
Shaping
Wood rarely comes in precisely the shape of the final project. Sometimes shaping involves molding a piece of wood or its edge with a saw, router, shaper, molding plane, or drawknife. Other times it involves steam-bending or laminating wood to fit a form. Extremely detailed shaping falls into its own category, carving, while shaping round forms is turning. Small detailed saw work is often called scrolling, after the scroll saw.
Carving
Carving comes in many different forms. Some projects are entirely carved, created by removing material from a block of wood. (Duck decoys are an excellent example of that, and chainsaw carving works similarly on a much larger scale.) Other times, carving adds extra detail to a larger project. Ornamental trim is often carved. There are an enormous number of carving styles and tools, both hand and power, available.
Scrolling
Scrolling generally refers to small and typically thin work created on a scroll saw, though some scrolling is larger and may be done on a bandsaw and other tools. A lot of scrolling projects (jigsaw puzzles, bookmarks, and decorative pieces, for example) stand on their own, without additional work except perhaps a coat of finish. Others are used to decorate larger projects, often as marquetry or inlay.
Turning
Turning is a kind of shaping, but generally considered its own discipline. Unlike most power tools, which apply moving cutters to wood, lathes spin wood to which the turner applies hand tools. Turning can be intimidating at first, especially with large blocks of wood, and depends enormously on the sharpness of the tools used, but doesn't require an enormous outlay for equipment. Turners can use green wood more easily than most other kinds of woodworking, and can often produce useful goods at a single session on the lathe.
Joinery
Some projects are held together with fasteners, like screws and nails, but a lot of projects use glue and specially created joints that handle wood's seasonal movement more gracefully. The simple butt joint, sticking two pieces of wood together at a right angle, isn't particularly strong, but is common. More sophisticated joints include mortise and tenon, dovetails or various kinds, scarf joints, and dados, rabbets, and grooves. Common hand tools for joining include chisels, saws, and drills, while power tools include saws, routers, and drills.
Assembly
Assembly isn't usually considered its own set of skills, and is probably best considered part of joinery, but putting all the parts together can be a challenge of its own. It requires understanding how best to glue, assemble, and clamp a variety of parts. It's easy to screw up an entire project at this step, especially if parts which need to be square aren't. Woodworkers also need to understand the seasonal movement of wood and how to compensate for it, keeping the furniture from tearing itself apart over time.
Finishing
Finishing is a combination of patience and chemistry. Cleaning up wood surfaces so that they look good under a finish may require a lot of dusty sanding if they aren't smooth enough to start with. Scrapers can help a lot, as can planes. When it's time to apply the finish, woodworkers need to understand both tools (from brushes to pads to sprayers) and chemicals (varnishes, shellac, lacquer, paint, etc.). Many finishes are appropriate for some uses but not others, and a lot of them are incompatible with other finishes. Some of them are toxic and flammable as well.
Other disciplines
While not necessarily woodworking per se, there are a number of tasks performed as a part of woodworking. To take just a few examples, upholstering, caning, leatherwork, metalwork, glazing, masonry, and electrical work may all be parts of woodworking projects.
The skills you need and the tools you use may vary greatly depending on which of these fields are important to you. A turner may just need a lathe, band saw, and maybe chainsaw suitable to the scale of their largest creations, some turning tools, and some sandpaper and finish (if desired). A carver might only need knives and some finish. A cabinet shop might create a limited number of joints with dedicated machines and hardware and a single finishing process, while a more general furniture making shop might require skills and tools from all of these fields. The scale of your projects can make a huge difference as well.
Future columns will explore all of these fields (though I should learn carving before I try to talk about it.) For now, I recommend using this breakdown as a guide to the kinds of things you might or might not be interested in doing, and especially as a guide to restraining yourself from purchasing things which sound fascinating but you don't really need. If you're setting out to make bookshelves from pre-surfaced lumber, you probably don't need an enormous lathe, a planer, or a chainsaw. If you want to turn bowls, a table saw and jointer won't likely be helpful. There is no single set of skills or tools appropriate for every project, even for those few with unlimited time, space, money, and patience.
[This was to be the opening for a column in an online venture that never took off, back in 2003. Mostly posted here because it reminds me why this interested me in the first place. I have another I'll post eventually.]
"When one has made with his own hands any object of use or ornament there is a sense of personal pride and satisfaction in the result, that no expenditure of money can buy, and this very fact serves to dignify the task and stamp it with individuality." - Gustav Stickley, 1905
"I've never really believed that a really good craftsman is intended for a tremendous public... the craftsman lives in a condition where the size of his public is almost in inverse proportion to the quality of his work." - James Krenov, 1976
I'm writing in an open-framed cottage built in the 1920s, admiring the exposed beams, tongue and groove paneling, and stone fireplace. A fire in a cast-iron stove is keeping me nicely warm, and locally-made fishing equipment covers the walls.
Looking more closely, I'm writing on a laptop made in China. The fire is fueled with propane. The factories where the fishing equipment was made are long since closed. Finally, the house itself has survived (for now) thanks to its location and the fact that it's primarily used only in summer. It's beautiful, but filled with reminders that old ways of making things are rapidly disappearing.
I started working in wood because I wanted to do something more concrete than programming and writing. Woodworking combines the immediacy of programming with the feeling of holding a physical book at the end of the publishing process. As I've gone deeper into woodworking, I've found it offers much more than those familiar pleasures. Woodworking is a practice where people can combine craft, tradition, and sometimes innovation, while stepping at least partially outside of the usual mass production process.
Woodworking is in many ways an orphan of the industrial revolution, though it has benefited tremendously from the tools that industrialization has made available. The notion of an individual producing complete pieces has been in decline for centuries, and has survived primarily to serve the affluent, both in custom woodworking and as a hobby. The Arts and Crafts movements in Europe and the United States celebrated visions of people making furniture for themselves while that vision was becoming less and less tenable. Making things, especially for a living, seems to have become a strange and unusual notion over time.
Woodworking has many facets, and defining what precisely "woodworking" is probably isn't worthwhile. Some people consider framing houses, milling lumber, and building furniture in factories to be woodworking, while others draw the line at finish carpentry or furniture making. Some craftspeople specialize in one or a few aspects exclusively, like finishing, turning, scrolling, or carving. Some design their own projects, while others build exclusively from plans, and some spend their time restoring work that's long since built.
There are also constant tensions between woodworking serving function, woodworking adding decoration, and woodworking as fine art. Some woodworkers see woodworking as a vocation and some see it as a hobby. There are many divides beyond "hand tool vs. power tool" or which brand of equipment to use. Different levels of commitment, different approaches, and different styles of practice and thought make for some complex and very rich conversations.
Politics of a more conventional kind also divide woodworkers. Many online forums have either banned politics from the conversation completely or put it in a separate "off-topic" place. Hippie woodworkers and dittoheads argue about the state of the world like anyone else, but it is often especially difficult to discuss politics that affect woodworking directly: environmentally friendly sources of materials, the conditions under which tools are made and sold, safety regulations of various kinds, gender and woodworking, and the nature of the markets into which professional woodworkers sell.
There are a lot of misconceptions around woodworking which make these conversations much harder. A lot of people seem to think woodworking is growing easier, that new tools have answered age-old problems. While I enjoy it, woodworking isn't always relaxing, and projects are almost never completed as quickly as in the neat formats where many TV viewers experience woodworking vicariously. Thinking it's easy brings new people into woodworking as a hobby and fuels demand for tools, but also makes it hard for woodworkers to charge for their work at rates which reflect the learning and effort which goes into it.
I'm hoping that this column will reflect the enormous and sometimes uncomfortable diversity in woodworking today, as well as some of its history. It'll take a lot of columns to cover even a small fraction of what's out there. Relatively simple practical projects will complement more general discussion, though I don't plan to compete with the many books and magazines already covering so many aspects of woodworking. While I'm leery of much of the advertising surrounding woodworking equipment, I'll also point to resources I've found that work well for me. Figuring out what you need and don't need is important, for both skills and tools.
I am not an accomplished woodworker, though I strive to be one eventually. Hopefully this can help the column, letting me can share my learning experiences with you as they happen, reflecting on what worked and what didn't. I'm hoping to have a few interesting disasters to show at some point as well. Some of the columns will be demonstration pieces, showing how to turn wood into new and useful or interesting forms. Other columns will explore woodworking as a practice, and how it has evolved over the past few centuries as social, economic, and environmental pressures have changed it drastically.
Like the early Arts and Crafts idealists, I'd like this column to inspire people to examine how they consume things and reconsider their relationship with their environment. If you have the time and interest to work with wood, that's wonderful, and I hope to show you some new ideas along the way. If you don't presently have time or interest, I hope the column can widen your perspective on a practice which has survived despite its lack of economic viability. There will be plenty of construction and contradiction in the columns to come.
My family went to the Museum of the Earth yesterday. While it was great to (re)visit a place my kids love, a place where they can learn about science, it made me think more critically about the strange ways we tell the exciting news of woodworking and carpentry.
There are certainly museums showing fine work. The Musée d'Orsay's furniture collection caught me by surprise years ago, and I've seen exhibits at the Metropolitan Museum of Art, the Peabody Essex Museum, and mixed into other museum's collections. Winterthur is an amazing collection of furnished rooms, with the Dominy workshop preserved behind glass.
There are also great living history museums, Colonial Williamsburg, Old Salem, the Genesee Country Village, Mystic Seaport, Hyde Street Pier, and many others showing how wooden things were made and used.
The Museum of the Earth doesn't have the excitement of the living history models or the rarity of the museum pieces, but it manages something else. It creates an approachable environment that visitors at all levels can explore, learning through hands-on activities, reading, pictures, models, watching others work, videos, and even toys. They do a great job keeping adults entertained while children explore, and presenting similar information in different - but not boringly repetitive - forms.
It is possible that somewhere there is a museum of woodworking that has learned from the science museums and the children's museums? I haven't heard of it and certainly haven't seen it.
I was lucky to get in from the wait list for Christopher Schwarz's Anarchist Tool Chest class at Roy Underhill's Woodwright's School for a week in September. Unlike the other woodworking classes I've signed up for, I actually managed to find the time to disappear for a while, and it was absolutely worth the time, energy, and money of a week-long trip to North Carolina. The book is good, but the class was amazing.
There were nine of us in the class, with Schwarz as lead instructor and Underhill as a very active participant. It was a great combination, as each of them had a different style and tool set, but pretty much shared a core set of values and techniques. Schwarz's tool chest included more recently-made tools while Underhill's shop is filled with vintage, and Schwarz brought a dovetail marker and Underhill disapproved of it. Schwarz spoke occasionally of power tools, while the only 'power' tools in Underhill's shop were treadle-powered. They were both clearly convinced that the way hand tools make you approach a project is the right way to do things, however.
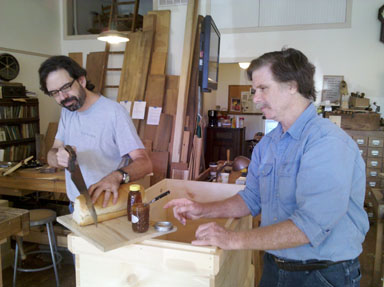
Chris and Roy serve a woodworker's communion.
I think nearly all of us identified ourselves as beginners at the start of the class, but it became clear quickly that some of us - me in particular - were more beginner than others. A number of people had taken classes at the school before, and some even had a reasonable set of tools to stock the enormous tool chest we were building. Many - maybe most? - of us didn't have a workbench at home, however, so it was especially good to work in a fully-equipped shop.
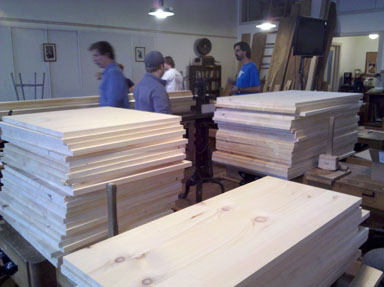
The other key was materials. In the book, Schwarz recommends Eastern White Pine. In a previous version of the class, they had used poplar, which slowed things down dramatically. For this class, they ordered sheets of glued-up pine at the right size for the sides and close to the right size for the top. There was still cutting to be done, for the bottom, battens, skirts, rails and stiles of the top, and the dust seal, which Schwarz and the faster students did during the class. The pine wasn't perfect - I think it's safe to say it had more knots than Schwarz recommended in the book - but it was extremely workable and we got through things ahead of schedule (for most people) or on schedule (for me).
The tool chest was bigger than I'd imagined, even though I'd contemplated the dimensions. Somehow I'd expected something more like Schwarz's traveling chest, which still felt large by itself but small in comparison to what we built.
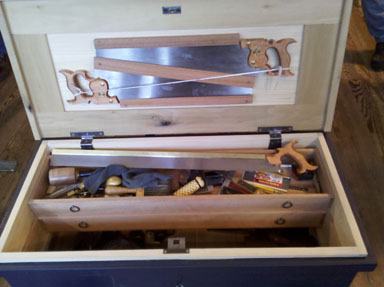
Schwarz's well-stocked travel tool chest with a special saw of Underhill's on top.
Schwarz didn't just bring his tools - he also brought his sharpening station. For a few of us this was our first serious experience with water stones, and he encouraged students to use his, even after one broke. He started that first day cleaning up the stones on the sidewalk outside of the storefront, a space that got used a few times for other parts of the project and to show an amazing knock-down Moravian workbench.

Using the great outdoors to clean up sharpening stones.
There were a few new (old) tools that really blew my mind, in ways I hadn't figured out by reading or watching videos. One of the best tools, and one I wound up buying before I left, was dividers. Discussions of dividers always seemed to be lacking the crucial question of where and how you set them, and Schwarz showed us how to set two pairs of them by eye to produce even marks for dovetails. One represented half a pin width, and the other the distance between the edge of one tail and the same edge of the next tail. It seemed like magic, and worked well.
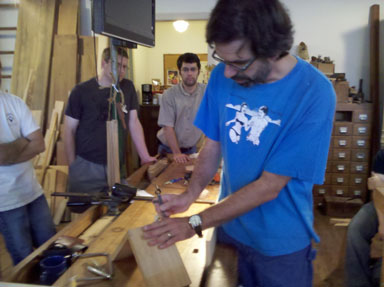
Schwarz demonstrates using dividers to set up dovetails.
Although Underhill's shop resolutely avoiding electricity for the actual woodworking, he used it for lighting, air conditioning, and a camera and monitor that made it much easier to provide a close-up view to a big group of students. Schwarz used it a few times when demonstrating a new technique, and it was much easier than crowding in for an imperfect view.
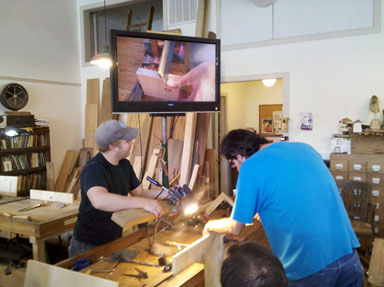
Demonstrating sawing with a video close-up.
Despite Schwarz's admonitions, I still managed to screw up twice, in the same place, on the tails for the dovetails in the top rear corners of the chest. Somehow I decided to cut through a tail piece rather than create it by removing the pins. I panicked for a moment, but he just pulled out blue painter's tape to indicate the error for a later fix, pointing out that both paint and the top skirt and dust seal would cover the damaged area anyway.
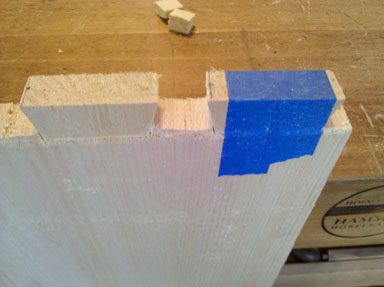
Blue tape marks my error, making it easier to track and cover.
I stayed roughly on the original schedule, though there were a few times early in the week when I wondered whether I would even have the basic box done by the end of the class, never mind the skirts or lid. Schwarz helped by emphasizing that I was on schedule and would make it, and he was mostly right. Each corner completed was a major relief, even though in speeding up a bit at the end I left more gaps than I'd hoped for.
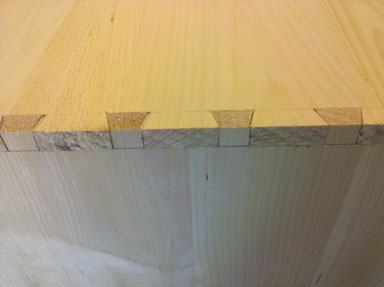
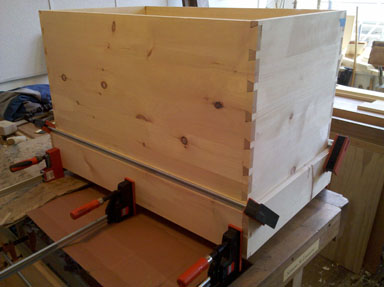
A corner of the chest, dovetailed.
Still, I spent most of my time downstairs, when it might have been a lot of fun to explore The Woodwright's School Tool Store, an astounding collection of vintage tools. Ed Lebetkin, who ran the store, not only let people try out the tools downstairs, but was also a regular presence in the classroom answering questions and offering encouragement. I visited the store the first day, but it wasn't until the very end of the very last day that I felt I had the time to visit. (That's where I got the dividers, as well as a nice eggbeater drill and a Woodwright's Shop video.)
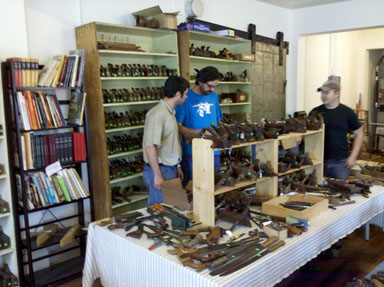
Ed Lebetkin's amazing tool store upstairs.
I was very very happy to glue up my chest there. Assembly and glue-up went much much faster with the help of fellow students. We used traditional hot hide glue on all four of the chest's corners, then clamped up the chest. A student from a previous class came in with a huge stack of extra clamps for us to use, which proved useful for this time when multiple people had lots of work being clamped. While we all spent a fair amount of effort squaring up our chests, I was happy that mine was pretty close to square at its initial clamping.
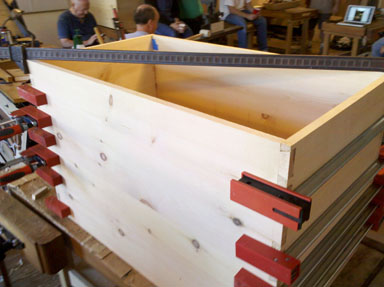
My tool chest poses as a clamp rack.
After that dovetail marathon, it was time to switch gears. The bottom boards needed to be connected with tongue and groove joints, and then their top surfaces needed a bead. That sounded like a lot of work until I went to do it - a Stanley #48 tongue and groove plane made it astonishgly easy, and a wooden beading plane was even less work for more beautiful reward. I know it was pine, but those few moments transformed how I see my router, and I think I'll be doing a lot less with it.
After the boards were prepared, I nailed them to the bottom of the chest with cut nails. I'd read Schwarz's praise of these fasteners, but hadn't actually tried them. Pre-drilling with an eggbeater drill was easy, and the nails went in easily. I had one tiny glitch in adding a set of battens when I tried to put one nail on top of another, but it all worked smoothly.
After all the easy parts, there was some punishment ahead - planing the boards flat against the edge of the box. That meant a lot of planing edge grain, and afterwards I wished I'd remembered to pack my flush-cutting saw, which would at least have reduced the planing if not eliminated it. I also dreamed briefly and heretically of my belt sander.
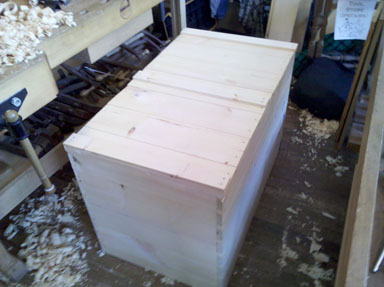
Chest bottom, nailed and planed.
After that, it was on to the bottom skirt. I assembled the initial two corners, which felt easy, a mere two dovetails, after the previously endless box. I also used a square ovolo molding plane to put a slightly decorative edge on the top of the skirts, and again, the molding plane was amazing.
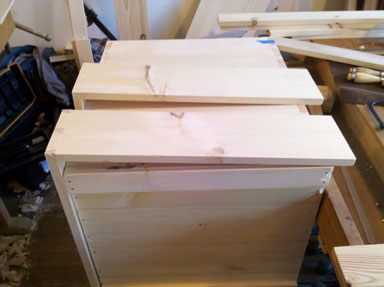
Bottom skirt, partially assembled.
Schwarz wisely insisted that we all work with a "skirt buddy" to mark the final lengths of the other two corners. This way we wound up with a bottom skirt that actually fit the box as it was instead of an ideal measurement that didn't fit any real box.
I didn't get to the top skirt. I'd like to say that I carefully saved it to be a demonstration project at home - it will be - but really I just ran out of time. I was happy to have the bottom skirt on.
On the last day, Friday, we all shifted gears to work on the top of the chest. Roy Underhill led this one, showing us how to create a mortise-and-tenon joint by hand, fitting around a panel grooved with the #48 plane again. One especially fun part of this was using one of his "machines" - a foot-powered mortiser.
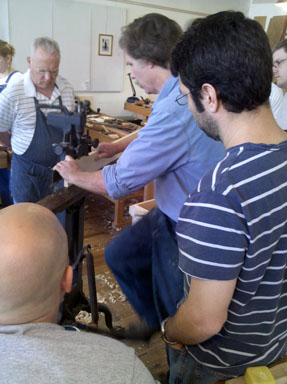
Roy Underhill demonstrates his amazing foot-powered mortiser.
I doubt I'll add a foot-powered mortiser to my shop - I'm not sure how I'd find one again - but it was a great demonstration of how much we can do with relatively simple (if large) and sharp tools.
I successfully marked out my tenons, and the shoulder cuts went well. I have some problems to address with the cheeks, however, and that was where I ran out of time, around 6:00pm on Friday with a long drive home.
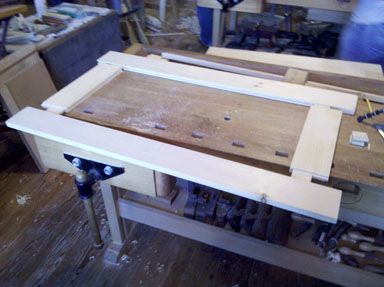
As far as I got with the lid - mortises, tenons, and grooves..
A few people did complete the box, getting at least some hardware - the hinges - installed. Schwarz demonstrated a few colors of milk paint, the finish he suggested, and we talked about hardware options and a variety of ways to lay out the interior. He paused the class occasionally to look over the school's tool chests, exploring the different layouts for different uses and some choices we would get to make when we got there.
I would absolutely recommend this class to anyone interested in working with hand tools, and I would also recommend Schwarz, Underhill, and The Woodwright's School for pretty much any related class. I was nervous going in, and slow throughout, but everything seemed set up to calm me down, help me through, and make sure I went home with not just a box, but new skills and fond memories.
I'll post more when I finish the box, but for right now I'm just very pleased.
If you'd like to see more, Schwarz's videos from our class tell a good story:
(And other interesting videos - previous Anarchist Tool Chest class at The Woodwright's School: Day 1 Day 2 Day 3 Day 4 Day 5 How to Use a Tool Chest Chris Schwarz's videos)
(I wrote this review before attending Schwarz's excellent class building the Toolbox, which I review next.)
I liked Christopher Schwarz's last book project, The Joiner and Cabinet Maker, so much that I actually wrote two reviews of it for different venues. I've enjoyed his next major work, The Anarchist's Tool Chest, but while it's still a strong book, my feelings are more mixed.
The book has three main components which fit together somewhat uneasily:
Schwarz's many opinions on hand tools (plus some other equipment);
Detailed instructions for actually building a tool chest, which remind me a lot of his demonstration of the projects in The Joiner and Cabinet Maker;
Assorted takes on the challenges of anarchism and craft in the 21st century.
While I doubt my politics and Schwarz's politics are that similar in details, I agreed with practically everything he writes here about anarchism. His take on craft is a much-needed corrective to the piles of particleboard I see out with people's trash on a regular basis. Those two pieces combine into a coherent overall politics of craft.
The problem, though, is that the political message surfaces once in a while and then disappears again. It's kind of maybe background in the sections on choosing tools and building the chest, but mostly it surfaces in opening and closing sections, with a brilliant intermission ("A Tale of Three Tables") between sections. When he's talking about tools or building the chest, he's just talking about tools or building the chest. Well, in a more exciting way than most writers, but the focus changes drastically.
The other problem seems common to pretty much all hand-tool books. They may guide you smoothly into projects that help you practice using the tools, but they assume you have a complete set available. This made sense for The Joiner and Cabinet Maker, which was after all about an apprenticeship in a functioning shop, but seems strange in an "Anarchist" context. It's certainly possible for newcomers to work in a shared shop of some kind, with a complete set of tools, but otherwise they have to figure out where to start in purchasing an enormous set of tools. Some lucky folks might inherit them, but most readers will have to invest lots of money or time to build even the core set Schwarz describes. None of those options feels particularly anarchist, though I'll certainly give Schwarz points for suggesting used or the best possible new equipment.
(The closest competition to the "Reason" section on tools, Garrett Hack's Classic Hand Tools, has many of the same problems. It bothered me less in that book, though, because it was more targeted at providing an overview and intense eye-candy. It's a nice complement to The Anarchist's Tool Chest in many ways.)
If you're an intermediate hand-tool woodworker already, this may not matter. You have a set of tools, and probably (most critically) a workbench. Schwarz's opinions are always interestingly presented, and may drive you to reconsider how you use your tools. The tool chest itself looks great, and I've had a lot of fun watching the variations that have turned up on the Lost Art Press blog and elsewhere.
Overall, this is definitely a good book. Most of my frustration with it comes in places where I think it could have been a great book, but stopped short.
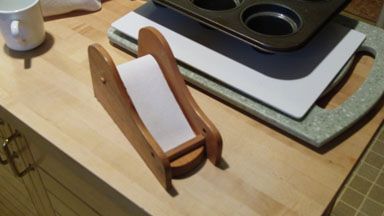
I must have built this in 1981 or 1982, in sixth grade. It's getting close to 30 years old, and still works, so long as my mother can find replacement cash register rolls.
I'm not sure what the holes above the crossbar were for. They might just be a nicely-integrated mistake. It's pretty much a shaped, nailed, glued, and sanded object. One side did break along the grain when it fell, but that just adds to the patina, right?
My seventh grade project, a strange mostly useless box built out of random maple scrap, has I think disappeared. It was pretty much only good for holding dice, which you could shake out of the gap between the handle and the main box. Oh well.
